Because we don’t have to mess up our local machine with dev configuration!
We already know that all the cool devs are using Docker for the local development environment. And there is Kuberenetes for the coolest group. But if we want to try out the application in a local Kubernetes node before deploying it to the production, things might become a bit complicated. And we have an hassle free solution for it! Let’s see how we can do that.
The only prerequisite is — Docker. Let’s assume we already have Docker installed and running.
minikube (alternative)
We can use minikube to run and test an application (image) in local Kubernetes. But it is super slow (my Macbook Pro starts radiating heat after a while). So, we are not going to use it.
kind (Kubernetes)
We are going to use — kind. It is runs local Kubernetes cluster in Docker container. Thus, it requires very little time to up and stop the Kubernetes node.
We can follow the Quick Start section of their official docs to install kind.
After we are done installing kind, we can create our Kubernetes cluster with the following command —
kind create cluster --name localIt may take a while to download the Docker image for the first time and we will see the following output when the cluster is created.

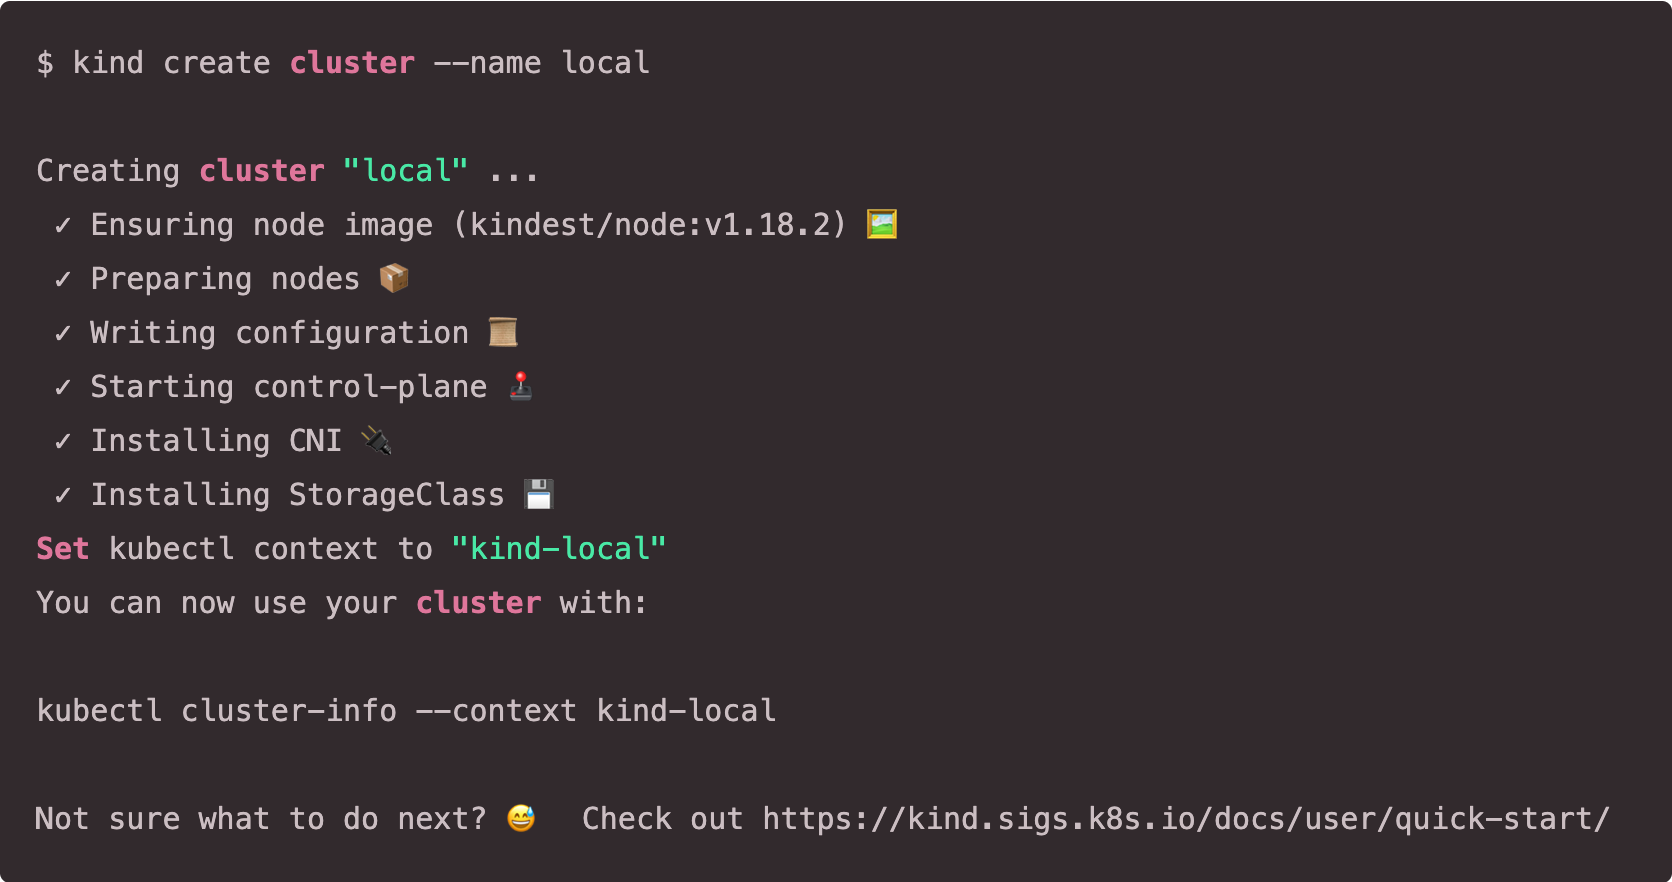
Now, we have a running Kubernetes cluster for local development. Thankfully, it automatically switches to the newly created kubectl context :)
Next stop, Helm!
Helm
Helm is a package manager for Kubernetes. We will use it to deploy our Kubernetes Dashboard with just a single line of command. Follow the installation guide in the official documentation to install Helm.
If you are running OSX like me and using Homebrew then just run the following command in terminal
brew install helmKubernetes Dashboard
Add Chart Repo
Helm uses a chart file to deploy any application. These chart files hold the configuration for that application that defines the controller, service, secret, and other resources for the application.
A repository holds a list of available chart files that can be used in deployment. Similar to a PPA in Linux based OS. Let’s add the repo for our Kubernetes Dashboard with —
helm repo add kubernetes-dashboard https://kubernetes.github.io/dashboard/Deploy Dashboard
Time to deploy our Kubernetes Dashboard with one single command —
helm install dashboard kubernetes-dashboard/kubernetes-dashboard -n kubernetes-dashboard --create-namespaceWe are deployed our Kubernetes Dashboard in the kubernetes-dashboard namespace and also passed the --create-namespace flag to ensure the namespace is created if it did not exist.
Access Dashboard
Now, if we can start the Kubernetes proxy server (gateway) between localhost and the Kubernetes Server.
kubectl proxyThis will proxy out Kubernetes cluster’s endpoints to the host (our local machine) so we access them.
Now If we open the following link—
We should be able to see the following page.

Congrats! We have a working Kubernetes Dashboard to monitor and manage our cluster resources :)
Our final task is to login to the dashboard.
Login into Dashboard
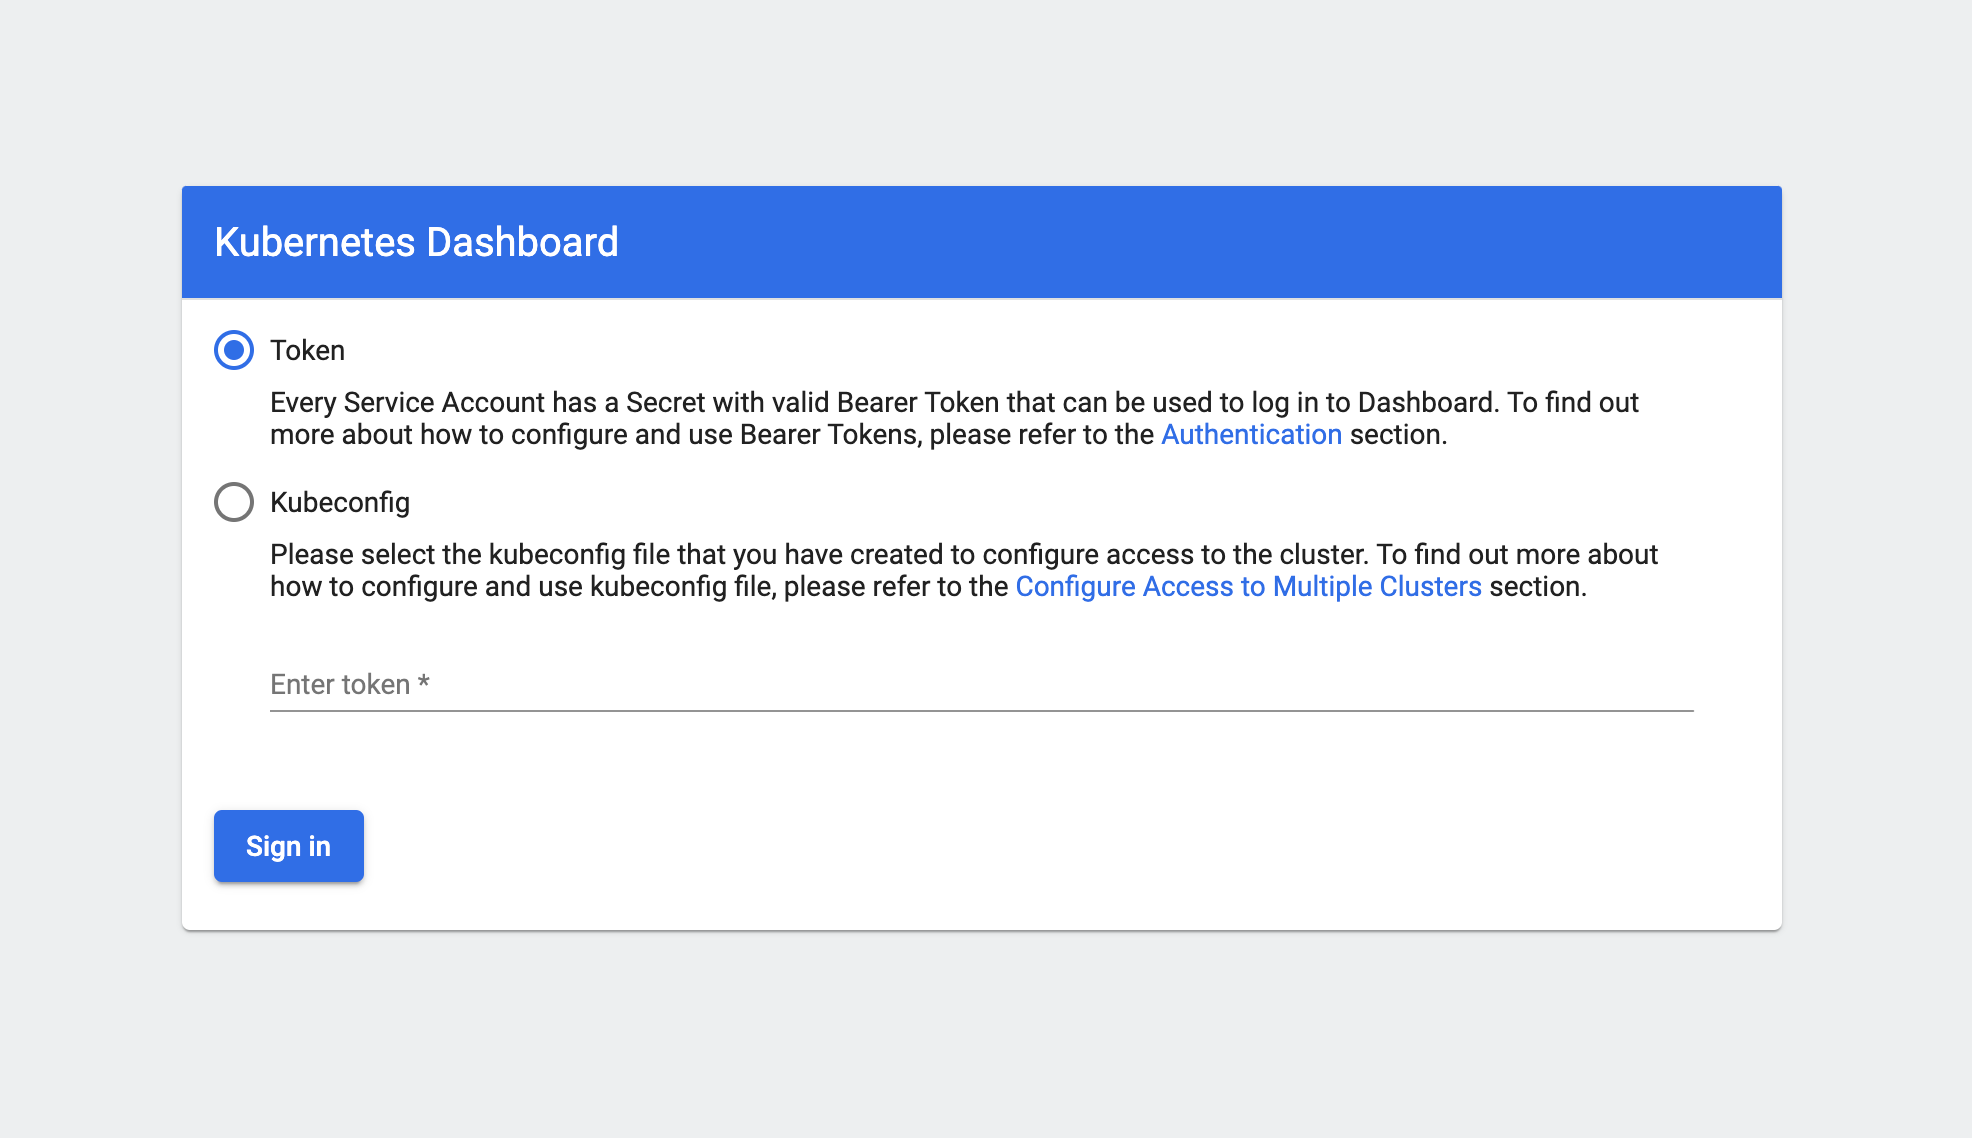
We need to use either a token or a kubeconfig file to access the dashboard. We will use the token method now. But first, we need to create a user and attach the necessary permission. And we do that by creatingservice-account.yaml file with the following content.
apiVersion: v1
kind: ServiceAccount
metadata:
  name: admin-user
  namespace: kubernetes-dashboard---apiVersion: rbac.authorization.k8s.io/v1
kind: ClusterRoleBinding
metadata:
  name: admin-user
roleRef:
  apiGroup: rbac.authorization.k8s.io
  kind: ClusterRole
  name: cluster-admin
subjects:
- kind: ServiceAccount
  name: admin-user
  namespace: kubernetes-dashboard
And running — kubectl apply -f service-account.yaml.
This will create a service account with the name admin-user and also a secret with the name admin-user-token-xxxx.
To get the secret (token) that we need to login to the dashboard, we run the following command first —
kubectl describe serviceaccount admin-user -n kubernetes-dashboardTo get the token name from the output.
Name:                admin-user
Namespace:           kubernetes-dashboard
Labels:              <none>
Annotations:         Image pull secrets:  <none>
Mountable secrets:   admin-user-token-cn2fd
Tokens:              admin-user-token-cn2fd
Events:              <none>
And then use the following command to get the token value from the token name.
kubectl describe secret admin-user-token-cn2fd -n kubernetes-dashboardWe will see a similar output as below.
Name:         admin-user-token-cn2fd
Namespace:    kubernetes-dashboard
Labels:       <none>
Annotations:  kubernetes.io/service-account.name: admin-user
              kubernetes.io/service-account.uid: cd762335-d4e5-473e-900f-9a9a20c2e5abType:  kubernetes.io/service-account-tokenData
====
ca.crt:     1025 bytes
namespace:  20 bytes
token:      eyJhbGciOiJSUzI1NiIsImtpZCI6ImFZUnczaFJSbjdSLTc0eTRhZTV0Z0xqSzVpQlpWQmhJbFlPSU1vUUhDbU0ifQ.eyJpc3MiOiJrdWJlcm5ldGVzL3NlcnZpY2VhY2NvdW50Iiwia3ViZXJuZXRlcy5pby9zZXJ2aWNlYWNjb3VudC9uYW1lc3BhY2UiOiJrdWJlcm5ldGVzLWRhc2hib2FyZCIsImt1YmVybmV0ZXMuaW8vc2VydmljZWFjY291bnQvc2VjcmV0Lm5hbWUiOiJhZG1pbi11c2VyLXRva2VuLWNuMmZkIiwia3ViZXJuZXRlcy5pby9zZXJ2aWNlYWNjb3VudC9zZXJ2aWNlLWFjY291bnQubmFtZSI6ImFkbWluLXVzZXIiLCJrdWJlcm5ldGVzLmlvL3NlcnZpY2VhY2NvdW50L3NlcnZpY2UtYWNjb3VudC51aWQiOiJjZDc2MjMzNS1kNGU1LTQ3M2UtOTAwZi05YTlhMjBjMmU1YWIiLCJzdWIiOiJzeXN0ZW06c2VydmljZWFjY291bnQ6a3ViZXJuZXRlcy1kYXNoYm9hcmQ6YWRtaW4tdXNlciJ9.Q9DYNpl_HE3XJEhid6WBFU-XHlwvErRZljtx_Oev5eCgoFO2iz03SPNw-gYHWSVeCDXO_mcDYqf9rb4SPbgZeEntdxy_Obbh2fiGjhqzcMuFeqZ9kZPuaLZq1O_BBIcDDKKE9o5TcsnbpbCPl3Tcjp7X1-kgi1hEYF7MrpdNA914vGrJDDy6yD1O6y7iNnG9ZZtKH8ZTeVEu7e2XaDOT98K6CX4RRSPx_hW9o0QeFV9_wdeJGcecggQLV6bobCqlZF6r8b1-GQtWe8zQ4Kn3LmFlyQ1iyD2yG3LDMMugeEfuQAvG4eDJmXte7o-4YM5rVafYJ6pBp3g3CHHjYaN2Kg
We copy the token from the output and paste it in the Kubernetes Dashboard login page. And after we sign in, we will see the following page.

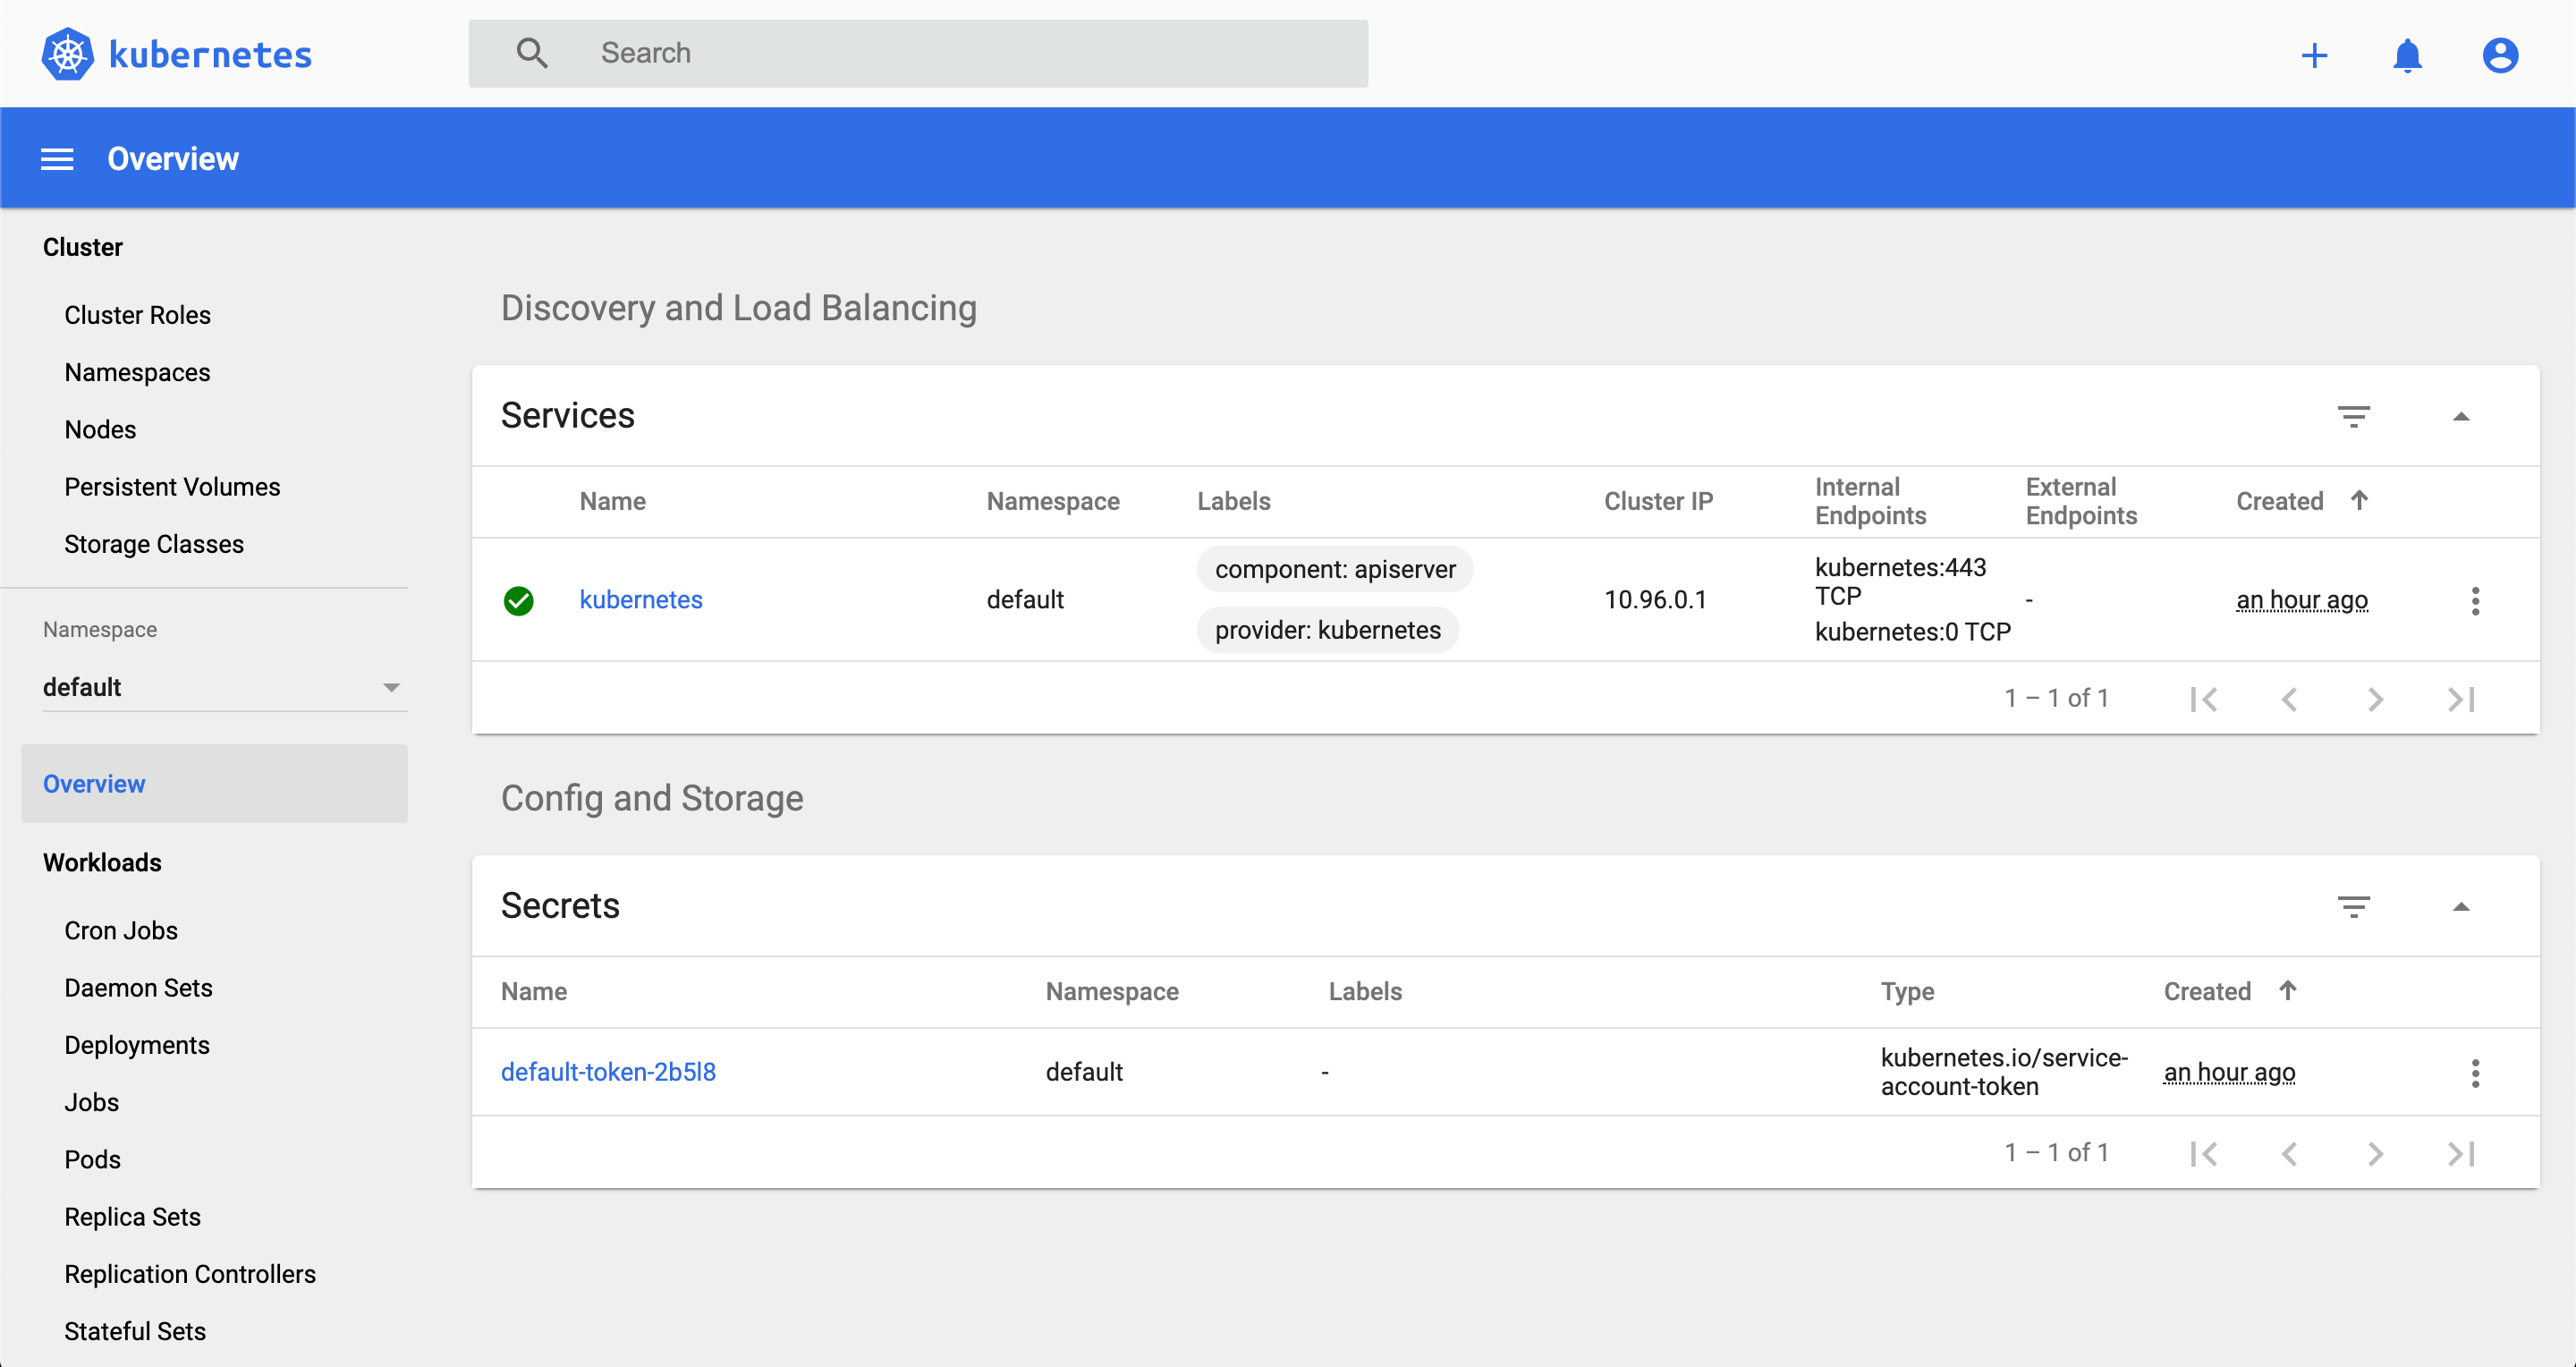
Welcome to the Kubernetes Dashboard Web UI where we can monitor, modify, and create any Kubernetes resource.
Personal Notes
- I use three different kind clusters for my personal, experiment, and work projects.
- I am currently using Docker and Docker Compose for the live code change in local development without the need of building image for Kubernetes.
- I will most possibly use either Telepresence or ksync to run the live code change for local development. For more info — https://kubernetes.io/blog/2018/05/01/developing-on-kubernetes/